Streamlining your Tailwind CSS workflow with ESLint + Prettier

Overview
If you're working with Tailwind CSS on a regular basis, there are a few tools at your disposal that can help streamline some of the code authoring workflow.
The Problem
One argument you often hear from opponents of Tailwind CSS is how unreadable it makes your page markup, and in particular the class attribute.
With long strings of numerous Tailwind classes and all sorts of possible combinations, it's understandable how that can become a bit daunting.
But, I'm here to tell you that it doesn't have to be!
The Solution
In this article we'll take a look at how tools like ESLint and Prettier can help us never have to think about class names again, and provide some helpful guidance along the way.
 Tailwind with ESLint and Prettier
ESLint is a code linter. Linters helps identify issues in our code, ensure consistency and reduce possibilities of bugs. They generally concern themselves with code logic.
Then we have Prettier, which is an opinionated code formatter. It concerns itself more with code style - things like line length, indentation, syntax, etc. Prettier's main job is to ensure consistency in code, no matter the development enviornment or the number of people working on the same file.
Regardless of whether a project is using Tailwind or not, ESLint and Prettier are both tools that should be part of our workflow. A lot of what we do as part of code authoring process can be automated away with these tools, and help reduce the cognitive load while writing code. With Tailwind, this is particularly noticeable.
Both ESLint and Prettier have an extensive 3rd party plugins ecosystem. There are plugins and shared configurations available for all sorts of use cases, enabling us to extend the base functionality of these tools. Frameworks and libraries often provide plugins that are meant to work seamlessly alongside them, whether official or developed by the open-source community, and Tailwind is no exception.
Setup
Installation
First, let's install the necessary libraries.
In addition to core ESLint and Prettier packages themselves, there are two main plugins that we'll need:
- eslint-plugin-tailwindcss for ESLint
- prettier-plugin-tailwindcss for Prettier
Install these as dev dependencies:
npm install -D eslint eslint-plugin-tailwindcss prettier prettier-plugin-tailwindcssConfiguration
Next, we need to create config files for both ESLint and Prettier.
ESLint
First, let's do ESLint. Create an .eslintrc file at the root of your project:
{
  "extends": [
    "eslint:recommended",
    "plugin:prettier/recommended",
    "plugin:tailwindcss/recommended"
  ],
  "env": {
    "browser": true,
    "es2021": true
  },
  "parserOptions": {
    "ecmaVersion": 2021,
    "sourceType": "module",
    "ecmaFeatures": {
      "jsx": true
    }
  },
  "plugins": ["tailwindcss"]
}
Here we're extending the recommended rule sets from ESLint, Prettier, and the Tailwind CSS plugin, as well as specifying eslint-plugin-tailwindcss itself to be used as a plugin. We're also setting some defaults for our project environment and parser options.
NOTE: This is the most basic setup. It's highly recommended to look into the advanced configuration options for ESLint, and take the time to setup additional plugins and options appropriate for your project environment.
Prettier
For Prettier, we'll stick with most of the defaults, overriding just a couple of options. Create a .prettierrc file:
{
  "printWidth": 90,
  "singleQuote": true
}
These are personal preferences - see the complete list of options and adjust as needed.
One neat thing with Prettier is that you don't need to explicitly list the plugins that you'd like to use. So long as they're in the same node_modules folder as Prettier itself, they're loaded automatically. Since we installed everything in our project already, we're all set in that regard.
Setting Up Scripts
Let's now create some scripts to help automate the linting process. In package.json, add a lint and format scripts. For demo purposes, let's assume all of our code is in src folder:
{
  "scripts": {
    "lint": "eslint --fix src",
    "format": "prettier --write src"
  }
}
The lint script will run ESLint on everything inside our src folder, and the --fix flag tells it to fix any automatically-fixable issues at the same time as well. This will use the config specified in the .eslintrc file we created earlier, including the plugins.
Similarly, the format script will run Prettier and format it using the options specified in .prettierrc. As mentioned earlier, Prettier loads its plugins automatically, so the Tailwind plugin will be loaded for us already.
For complete list of available CLI options, see Prettier docs.
Using Scripts
With our scripts defined, we can now run these as part of our workflow to lint and format our code.
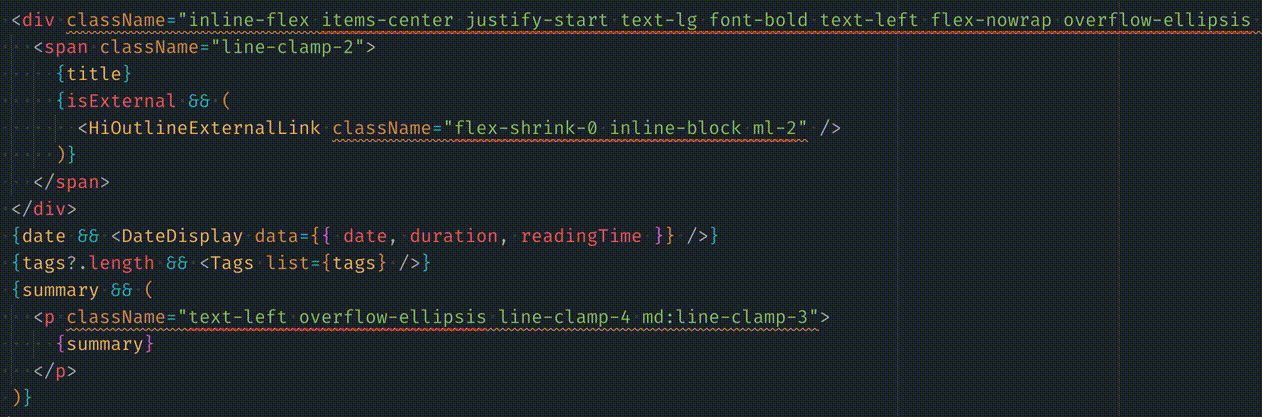
To test it out, run npm run lint. Here's a real example from my personal site that I ran into recently:
 Example of output from ESLint
As you can see, eslint-plugin-tailwindcss helped identify some deprecated classes that I was still using. Neat! I'd been using Tailwind v3 for some time now, without realizing there were deprecated class names in my code. Without this plugin, there's a good chance I still wouldn't have noticed this.
Similarly, prettier-plugin-tailwindcss tells me that a number of Tailwind classes aren't sorted properly in a few places. Little while back, Tailwind team introduced official class sorting, which with the help of this plugin sorts classes in a specific order. This order essentially follows how Tailwind structures the classes in the final CSS output. Having them sorted the same way in the code helps to visualize the cascade, which IMO is extremely helpful.
Pre-commit Hook
Running these scripts manually every time is not great. Let's fix that!
To help automate the process, we can use husky to create a pre-commit hook that will run lint-staged, which in turn will run these linting scripts on staged files, before committing them.
To do this, run the following command:
npx mrm@2 lint-stagedThis does a few things:
- Installs
lint-stagedandhusky - Creates a pre-commit hook in the
.huskydirectory which runslint-staged - Updates
package.jsonwith config forlint-staged
Notice the new entry in package.json:
"lint-staged": {
  "*.js": "eslint --cache --fix",
  "*.{js,css,md}": "prettier --write"
}
Let's update this to use our scripts instead:
"lint-staged": {
  "*.js": "npm run lint",
  "*.{js,css,md*}": "npm run format"
}
This will tell lint-staged to run our lint script on all staged JS files, and format on JS, CSS and MD(X) ones (as always, adjust this as needed). Now, before any code is committed, it's guaranteed to be linted and properly formatted. If either of those scripts fails, a commit will not proceed and we'll see what the issues are in the output:
Example output of our linting script
Integrating with VSCode
Now this is where it gets even better. If you're using Visual Studio Code, there are extensions that can help automate things further.
Extensions
Install the following VSCode extensions:
- ESLint (
dbaeumer.vscode-eslint) - Prettier - Code Formatter(
esbenp.prettier-vscode) - Tailwind CSS IntelliSense(
bradlc.vscode-tailwindcss)
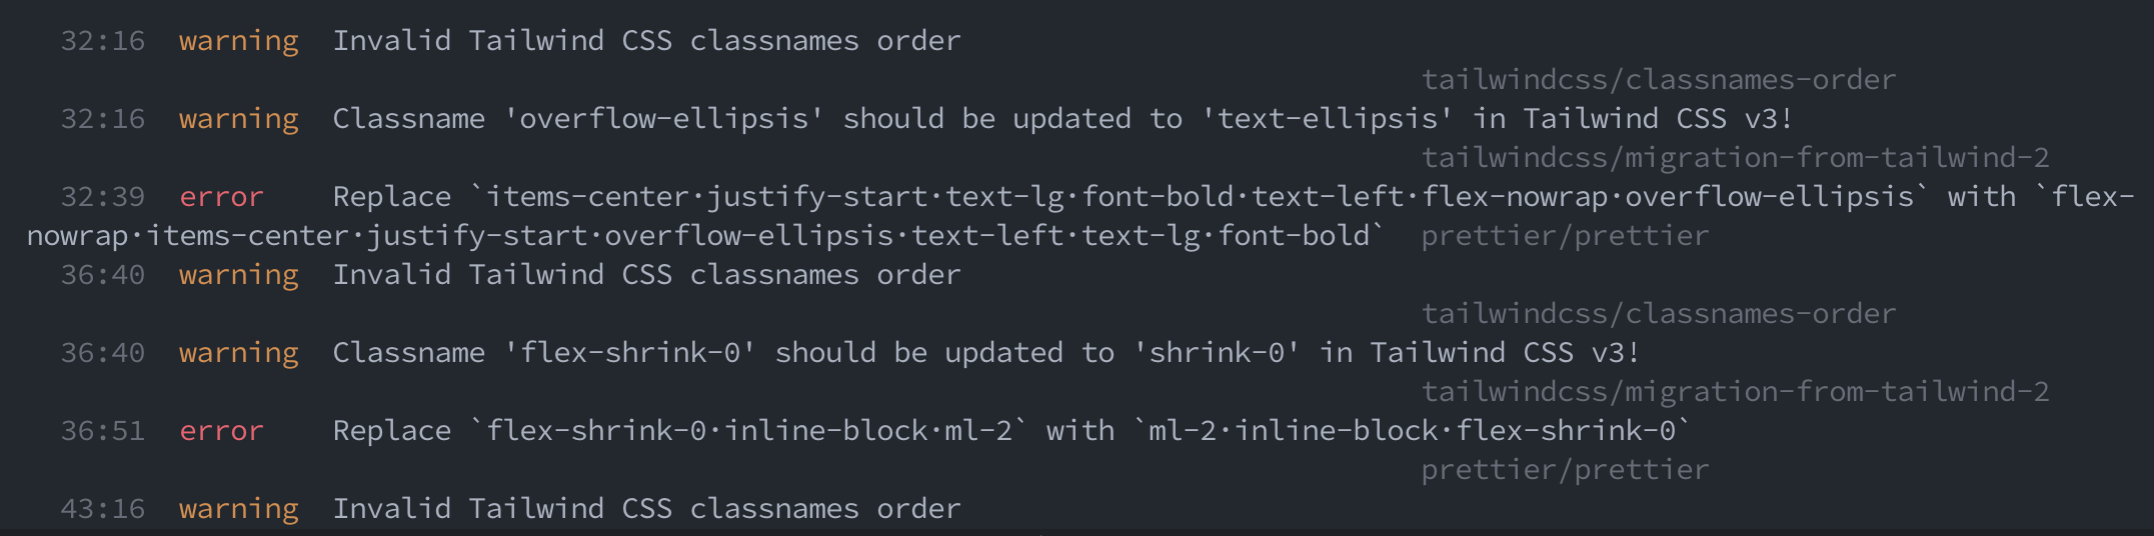
The first two integrate ESLint and Prettier into VSCode, which will let VSCode underline any problematic code that is identified:
 Example of issues identified by ESLint Tailwind plugin
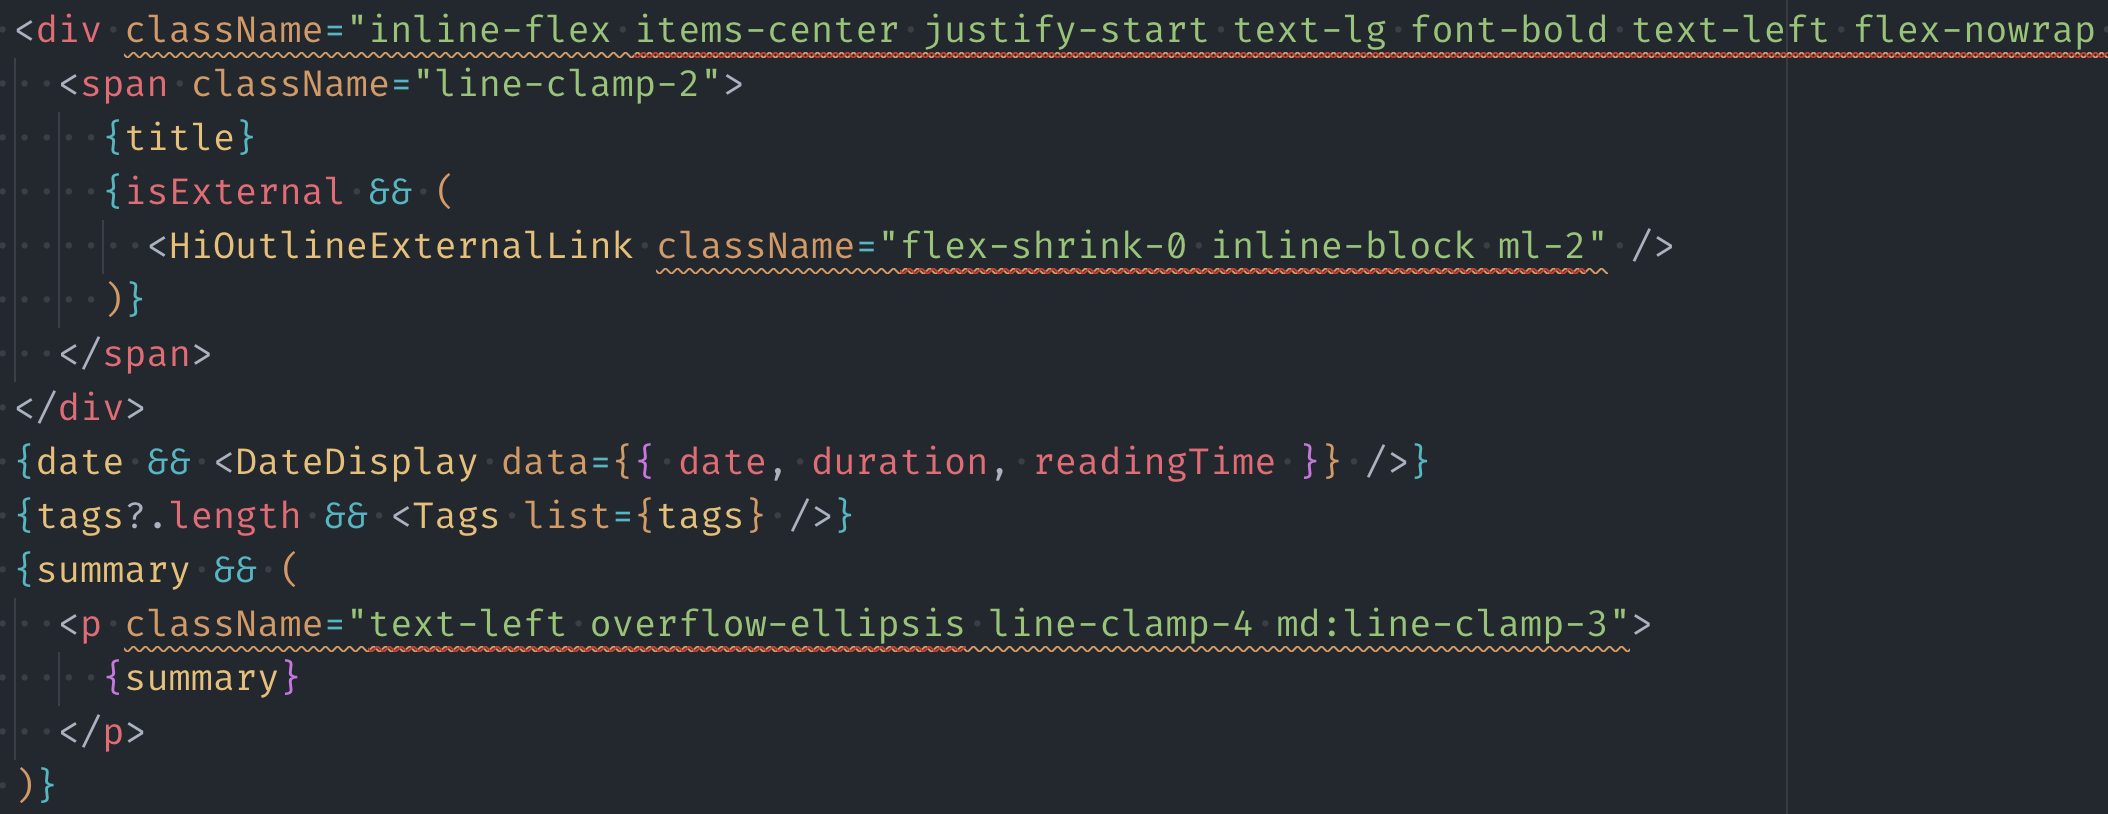
Hovering over the issue will show more details:
 Example of issues identified by ESLint Tailwind plugin
The Tailwind CSS IntelliSense extension adds intellisense for Tailwind classes. This will let VSCode show suggestions for Tailwind classes, and what CSS they output. It even works with any custom classes you have defined in your Tailwind config. Very handy!
Now, as long as you have the .eslintrc and .prettierrc configuration files in your root, VSCode will highlight any applicable issues in your code, using the provided configurations.
If you'd like to take it a step further, you can also create a .vscode/extensions.json file in your repo to provide a list of recommended extensions for anyone cloning it:
{
  "recommendations": [
    "dbaeumer.vscode-eslint",
    "esbenp.prettier-vscode",
    "bradlc.vscode-tailwindcss"
  ]
}
Enabling auto-format on save
The last thing we want to do is enable automatic code formatting whenever we save a file in VSCode. This way, you let the tools worry about style and formatting, and can just focus on writing code.
Tailwind with ESLint and Prettier
First, open up your VSCode settings.json file: Preferences: Open Settings (JSON). Make sure that the default formatter is set to the Prettier extension:
"editor.defaultFormatter": "esbenp.prettier-vscode"Then, enable format on save:
"editor.formatOnSave": trueNote that these settings can also be specified separately for specific languages:
"[html, javascript]": {
  "editor.defaultFormatter": "esbenp.prettier-vscode",
  "editor.formatOnSave": true
}
Now, whenever you save a file, Prettier will format it using the VSCode extension. This means that not only do you get all the nice formatting from Prettier config, but your Tailwind classes will also be in the same consistent order thanks to the Tailwind CSS IntelliSense plugin.
Shared Config
If you like this setup (and are using React and Next.js) - all of the plugins mentioned here (and a few others) are included in my personal shared config:
These days Next.js and Tailwind are my default go-to's when building a new project, and I'll generally want the same rules applied throughout, including the same set of plugins. This shareable config makes it easy to use my preferred configuration, and not have to worry about setting up everything from scratch every time. Just install, extend, and you're good to go!
This particular config is based on the popular Airbnb Javascript Style Guide and extends the corresponding eslint-config-airbnb, as well as few others that I always find myself using. Feel free to use it in your project as well!
Build Your Own
If you're interested in making one of these on your own, check out my video tutorial on how to do just that:
Thanks for reading!